December 17, 2014

Melted Puffy Slouchy Hat


You will need:
  • All In One Loom
  • Bulky Yarn (weight of 5 or 6)
  • Yarn (weight of 4) * You will be using two strands at once so you can use either two different colors or the same.
  • Row Counter (optional)
Videos that may help:
(Click on title to view)
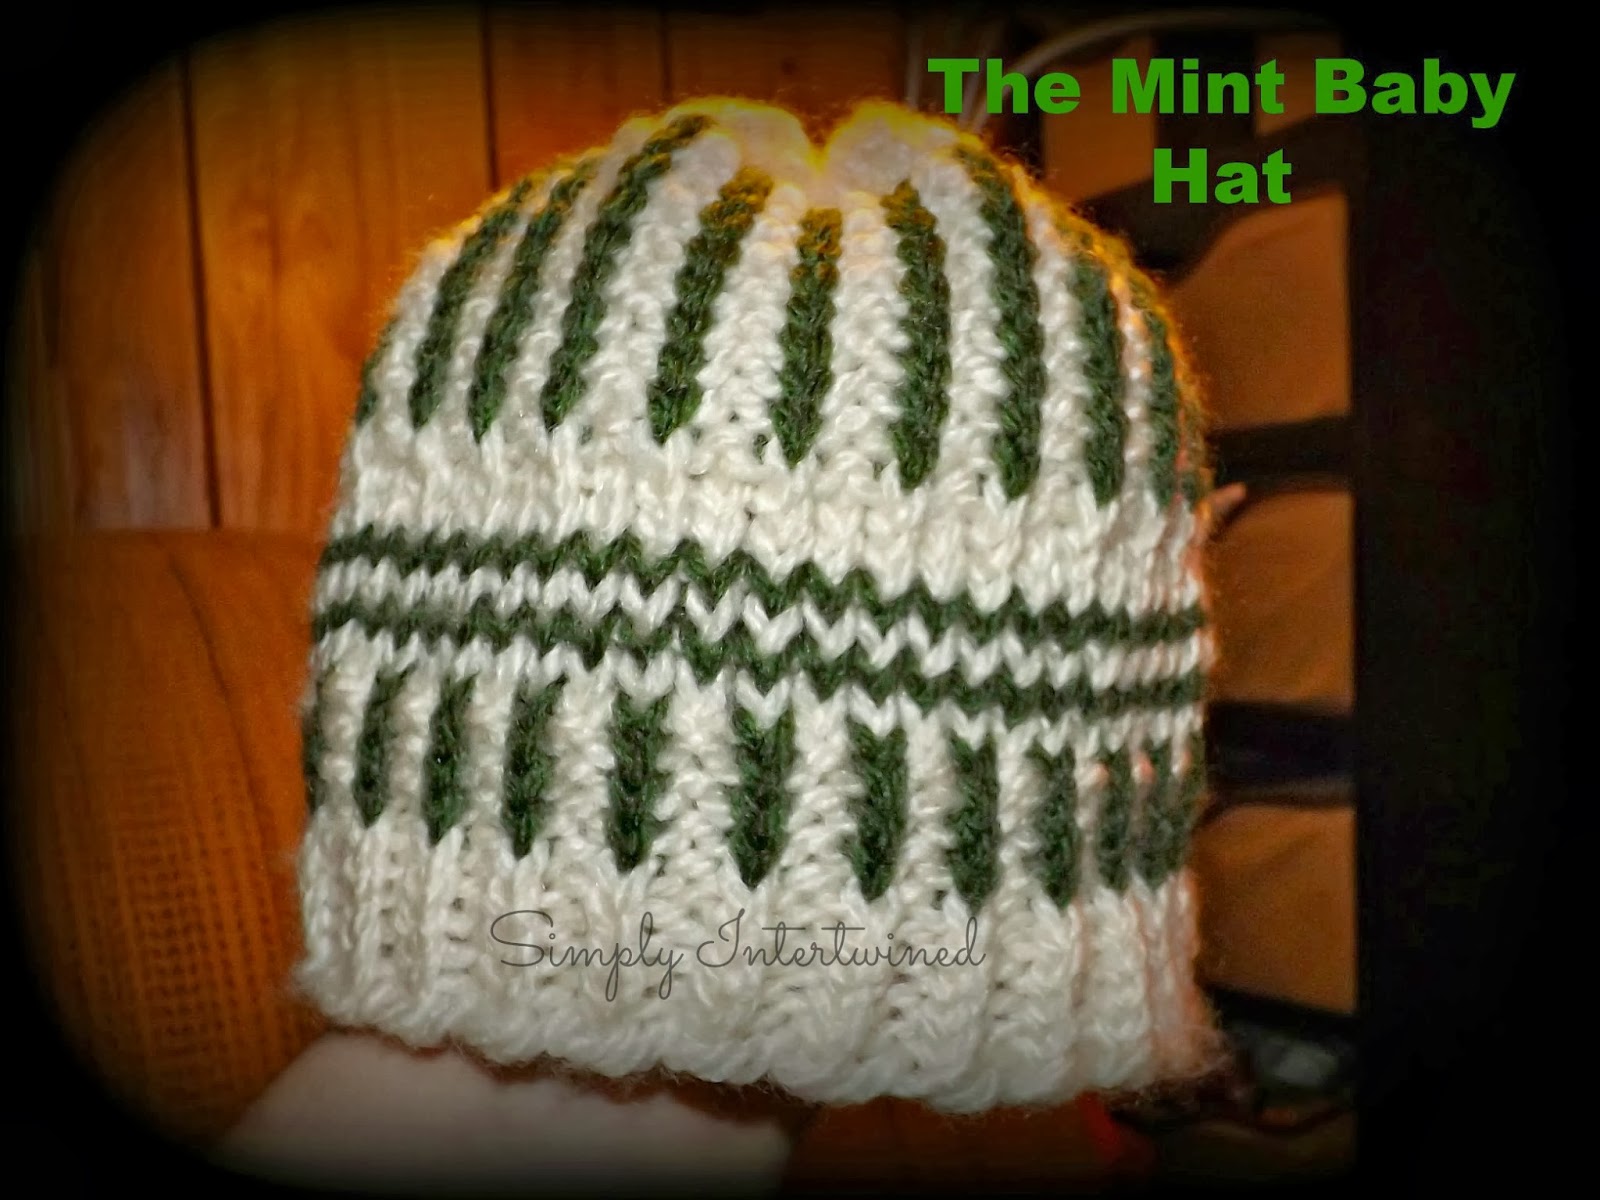
Notes: MC refers to "Main Color" & CC refers to "Contrasting Color"
           Knit refers to e-wrap knit unless stated otherwise
  1. Set 74 pegs in a round on the All In One Loom
  2. Scalloped Cast On in MC
  3. Flat Knit 1 row
  4. E-ewrap Knit 1 row
  5. Rib Stitch (K1P1) 5 rows
  6. Add CC, leave MC alone. (Remember you will be using two strands of this weighted yarn at once.)
  7. Knit 3 rows in CC
  8. K1P1 2 rows where you Knit in MC and Purl in CC
  9. P1K1 2 rows where you Purl in MC and Knit in CC
  10. Cut CC and attach to MC
  11. Knit 1 row
  12. Increase by two pegs by moving slider over one
  13. Knit 1 row
  14. Increase another 2 pegs like before
  15. Purl 1 row
  16. Knit 1 row
  17. Increase by two pegs again
  18. Knit 2 rows
  19. Increase by two pegs again
  20. K1P1
  21. P1K1
  22. Increase by two again
  23. Knit 1 row
  24. Increase by two again
  25. K1P1
  26. P1K1
  27. Increase by two again
  28. Purl 2 rows
  29. Increase by 2
  30. K1P1
  31. P1K1
  32. Knit 6 rows
  33. Cut MC attach CC
  34. Knit 8 rows
  35. Drawstring bind off

November 28, 2014

Slow Cooker Fall Soup


Recently, I posted a video about the following recipe (click here) and realized I should have it down in written form as well.

You will need: 
  • A slow cooker (crock pot)
  • 1 small can beef broth (preferably with reduced sodium) 
  • 6 frozen meatballs 
  • 1/2 to 1 cup broccoli
  • 1 to 2 cups butternut squash cut into chunks
  • half a small zucchini cut up
  • half a yellow squash cut up
  • 2 Roma tomatoes cut up
  • half a small onion chopped up
  • 2 stalks of celery cut up
  • a couple dashes of McCormick Perfect Pinch All Purpose Salt Free Seasonings
  • a little butter
  • dash of pepper
Procedure:
  1. Place broccoli, celery, zucchini, yellow squash, butternut squash and frozen meatballs in slow cooker.
  2. Add the can of beef broth (do not add water)
  3. Cover and set slow cooker to cook on low for 8 hours. (Soup may be done before then)
  4. At about 3 hours in, remove meatballs and cut into fours then place back in slow cooker. 
  5. Saute onions with a little butter and a dash of pepper in a pan on the stove.
  6. Uncover slow cooker and add the McCormick seasonings, onions and cut up tomatoes. 
  7. Recover slow cooker and continue cooking for two hours. 
  8. Enjoy with pasta, rice or on its own. 
*If you want more "broth" you can add a can of water to it at the beginning. 


November 18, 2014

"Old" To "New"

My daughter is home sick today, changing some plans I had for the day. But, Sunday I moved her old changing table out of storage and into our living room to use as yarn/craft station.


October 22, 2014

4 Craft Ideas I Want To Try

As the holidays approach I want to expand my craftiness to other areas. Below are some links to ideas I might want to try for this holiday season. Please comment with any on your list.

October 7, 2014

I Feel Slightly Guilty...

I have never done this before. I feel guilty...somewhat. Therefore I must confess....

September 19, 2014

Lace It Up!


I have said this a few times and decided I would share an idea that is "still in the works" but if you want to try go right ahead! (Just share the finished product with us.)

So here is the idea:

September 14, 2014

Outside The Box...Again!

As I always say, think outside the box and look outside the craft section of a store. The other day I picked up the following item.

August 25, 2014

Starting Another...

I never thought I would get into crochet, but do like simple hats or blankets done this way. What's on my hook today?


August 24, 2014

5 Challenges For You


Okay everyone, I want to challenge you to do one or all of the following challenges this week and report back to me. Are you ready? 

Let's Go!

August 22, 2014

It Needed Some TLC...

Some projects take longer than others of course. Blankets are one of them. When someone asks how long does it take to make a blanket, it's hard to say honestly.

It depends on:

August 12, 2014

Woohoo! Shelf Runner Done!

So, FINALLY, the bathroom runner I have been working on is done. Now, it shouldn't have taken this long but I was distracted a few times during the process. But, I really like how it came out!

August 10, 2014

Halloween Idea

As summer begins to wind down I know everyone is excited about the upcoming holidays and what you can make with your looms. Today I had an idea, using one of the videos I have already done.

August 9, 2014

Confession Of A Loomer

As of a couple weeks ago, my husband decided we needed to have a trial separation. It threw me for a loop. 

August 6, 2014

Update Of Runner For Bathroom Shelf

Remember my post about how I was working on covering the top shelf in my bathroom (click here for post) well here is some progress.

July 29, 2014

Announcement

UPDATE: ALL GOOD NOW

If I do not respond within 24 hours to a question/comment it is because I am switching my internet service around so please bare with me. Have a great day!


July 13, 2014

Shouldn't every room in your house have a little something loomed?

Okay so the other night I got a new shower curtain and rugs for the bathroom.


I am on a mission to slowly improve our place in little ways. Replacing some items, tossing out others. Today the loomer in me is inspired.

July 8, 2014

Basic Steering Wheel Cover Pattern

Before
*Important, you will want the cover to be tightly on there to be safe to drive. 

After doing some research I came up with my plan of action.

July 5, 2014

Tell Family You Want Yarn And...

So, I know I have posted receiving yarn before but I love sharing with you guys! After all, it is important to remind you to tell family/friends about your want--I mean need--of yarn, right?

June 27, 2014

Introducing "Ally"...

I was so happy to finally get a better way to display hats either at craft shows or when taking pictures.

June 26, 2014

Help With Hat Sizes

Just a quick reference for hat sizes:


June 22, 2014

Pet Peeve #1

Looming is serious business. Okay, maybe not to everyone but if you are reading this chances are it is to you. I was thinking about some of my "pet peeves" regarding looming and figured I would share some of mine from time to time. Here is one :

June 13, 2014

Kumihimo


I'm sure I'm not the first to try this but when I saw it at Walmart for $3 I figured it was worth a try. It is a Japanese form of making a bracelet I believe. I found a couple basic videos and went from there.

June 8, 2014

1st Crochet Hat...Hopefully

I have been thinking over the looming book I want to write the last few days. I tend to think of a writing project for awhile before tackling the outline of it and the actually writing process. So, I decided while I was thinking to attempt a crochet hat, at least what I hope it will be when I'm done. I looked at a couple videos online but for the most part I am "winging" it.

June 5, 2014

He Asked A Question?!

My husband decided to take me out for lunch today. I decided, inspired by fellow loomer Beth H., to put a looming project in my bag. My husband's not a big talker, unlike me, so I figured I could make something while there instead of talking his ear off. (He had a headache before we left the house.)

I brought my spool loom, some scrap Bernat Baby Blanket yarn in blue, and my crochet case which also holds my a looming tool and scissors. I figured I could make some extra freezer pop cozies while there.

May 31, 2014

How To Block Yarn


How to block yarn is a question I get a lot but due to limited space I haven't been able to record my own tutorial. Therefore, I wanted to share a couple articles & videos to help you with the blocking of your yarn.

Dusty Rose Hat Free Pattern


What you will need:

  • The 62 peg long, blue knifty knitter, crochet hook, looming tool, row counter and worsted weight (4 yarn). (You will be using one strand to start then using two so decide if you want the yarn the same color or not.) 
        * NOTE: You can try it on the other size looms to see what sizes you will get. 


May 24, 2014

Input Needed Please (And Thank You!)

I have been toying with the idea of writing my own type of loom knitting book for a while now. It will take some time to put together but I wanted to get some opinions on how to explain stitches. I am a visual learner as well.

In order to teach...

As I have most likely said before, in order to teach, I have to learn first so that's what I'm doing. I know a lot of times it may seem like I'm not doing much but believe me behind the scenes of Simply Intertwined is crazy! (But in a good way.) I love what I do and I hope that translates to everyone who reads my blog and watches my videos.

May 21, 2014

This could be bad...


I recently posted on my Plus Size To Down Size blog about finding my mp3 player which will make my walks more enjoyable. Now, I found out it has a way for me to record my voice.

This...could...be...bad.

May 17, 2014

Update: My 1st Crochet Blanket...

My 1st crochet blanket is still a work in progress. (For previous post click here)

Today I wasn't able to work on my looming video for the bag due to a cold and sounding like a frog. Instead I decided to start working my first crochet blanket again which I haven't since December.

May 11, 2014

Get Your Loom Ready!

For Mother's Day here is a sneak peek at my next free pattern/video.


What is this you ask?

May 9, 2014

5 Ways To Improve Your Looming

When I first starting looming I made mistakes, like any loomer would, and as the years have past I started to think of what made me a better loomer. I am not the best loomer but I am better than I was when I started. I have mentioned some of these before but truly these are my top five ways in one list.

#1. Tension

May 5, 2014

Oh Where, Oh Where Has...

"Oh Where, Oh Where Has Some Of My Looms Gone? Oh Where, Oh Where Can They Be?"


Seriously.... this is the song stuck in my mind due to the fact I can not find a couple of my looms. Looms I wanted to make patterns for in the next few weeks.

May 1, 2014

All Loomers Start Somewhere


I was reminiscing today about the first hat I ever made on my first set of looms (Knifty Knitter circle looms). It was not perfect. Take a look. (This is from Feb. 2011)

April 19, 2014

Curtain Tie Back Idea

I woke up this morning and decided to open some of my windows to let the cool breeze outside in for a little bit. However, I needed to do something to let the breeze in past the curtains so I grabbed some pieces of nearby yarn (isn't yarn always nearby? lol) and tied the curtains in the middle.

Then I looked at it, snapped the picture above and thought to myself "I'm a loomer. I can SO do better than a silly, single piece of yarn!" 

April 8, 2014

Behind The Scenes


The joys of video editing, which I actually do enjoy.


Deciding the parts I can "speed" up, adding notes to it and so forth. Maybe it's the writer in me, maybe I'm a little crazy. 


I am editing the Mini Easter Basket now, which I have a pattern for, and hopefully will have it up by tonight. Then editing a video for my Plus Size To Down Size Blog/Youtube channel.

I love my job; I can be creative and my own boss. LOL 

April 7, 2014

A Cute Little Surprise For Me

Last night I was able to see the girl who inspired The Foster Hat pattern and this time she surprised me with a present. She came down the stairs, hands behind her back and a smile on her face. She said, "I have something for you." Then she brought her hands out front and there it was: a cute, little pillow she had sewn.
I smiled and said thank you. Seeing her smile at my acceptance of it was so heartwarming. I understood though. At this time in her life, being in foster care, there isn't much she can control. I understood that some would scoff at her gift but I knew that even though it may not have been intended for me at first while she was making it, it has found a home.


It definitely made me smile and brightened my evening. What has brightened your day? 

April 1, 2014

Mini Easter Basket Pattern

Height is 6.5-7 inches Tall


You will need the small blue Knifty Knitter (24 pegs).
Two Strands of Worsted Weight Yarn (weight of 4)

  • Using two strands of yarn, do the drawstring cast on. (Click here for video)
  • Knit one row (e-wrap method was used)
  • Purl one row
  • K3P3 for 6 rows
  • Close drawstring
    • It will be tight, don't pull too hard. Close as much as possible and use a crochet hook to tie it closed. 
  • K3P3 for 2 rows
  • P3K3 for 2 rows
  • K3P3 for 2 rows
  • Crochet Bind off with one chain in between (Click here for video)
  • Now make an I-Cord for 30 rows with one strand of yarn and attach to basket for handle. (Click here for how to make an I-Cord)
    • Use a crochet hook to tie handle to basket. 
  • Fill with a small surprise! 


March 31, 2014

My 3 Top Yarns (So Far)


Yarn.

It's what loomers live for and use everyday. Over the 3 years I have been looming I have a couple "favorites" I buy when money allows. Most of the time I use Red Heart Saver yarn due to cost but sometimes you have to "splurge".
I will be linking to Joann Craft And Fabric store since this is my local yarn store. Keep in mind these yarns may be available at other stores of course. l


  1. Lion Brand Vanna's Choice I have used this with fingerless gloves. I love the softness of it for projects that are going to be against the skin. 
  2. Bernat Baby Blanket Yarn If I have a choice I love this yarn for baby blanket, especially if you live where it snows and gets very cold. I have made adult blankets out of this yarn as well so don't think it is just for babies.  I linked to the bigger skeins of it but you can get it in smaller skeins. It's super thick and soft!
  3. Red Heart Comfort Yarn I like to purchase the bigger skeins of this yarn because it lasts awhile. It is softer than the Red Heart Saver yarn but not as soft as the Lion Brand and Bernat I have already mentioned above. 


As I get to experiment with other yarns I'm sure I will have new favorites. What are your favorites? 

March 29, 2014

Adding "Ring" Handles To Bags


Sometimes I am asked how I attached the handles you see above onto bags. These handles are just "rings" and the process it not too hard. If you watch my "Earflaps On A Loom" video that is the start of attaching the handles. 

First, you want to create two "tabs" (aka earflaps) on each side of the loom (directly across from each other), whether a circle or straight loom. Width of tabs is up to you. 

March 28, 2014

Movie Titles With A Looming Twist


Okay, I admit it. I was a little bored this afternoon with a looming project so my mind began to wander. I can't be the only one to have done this so let's see how creative and long of a "movie" list we can come up with. Do you have any you would like to add? Take a looming break and comment below! 


March 26, 2014

The Foster Hat

This past week I was able to make a cute, simple hat for a child in the foster care system. She loved it!


Using 76 pegs in the round on the All In One Loom, I alternated color and stitches. I didn't have a set pattern, deciding for this project to just loom it. I started with a chunky, pink yarn and did a small garter brim. From there, I switched to a soft, pretty blue yarn and "winged" it by alternating the stitches. I use a few rows of regular e-wrap knitting then went into the Figure 8 Stitch for awhile, then to the Moss Stitch, finishing off with the e-wrap knit stitch and basic bind off. The girl was in her teens and the hat fit her and me. I was happy she loved it.

The yarn was actually given to me by a couple looming friends and I want to say "Thank You" again because I repaid your gift by making a gift for someone else.

That is part of what looming is about to me. This will be under "free patterns" even though I don't have "specifics" in terms of row count. Just trust your instincts for how many to do of each.

March 23, 2014

Bloglovin, Have You Heard Of It?

Follow my blog with Bloglovin

I have recently heard of "Bloglovin" and was curious if anyone else had as well? It is a place to follow and find blogs that you will love. Trying it out today while finishing a hat on my All In One Loom. I have no written pattern for this, just alternating stitches when I feel like it. Sometimes I just like to pick up a loom and see what happens. Never be scared to just loom.


March 16, 2014

"A Little Love" Diaper Cover

**NOTE: DESIGN IS ON THE FRONT AND BACK OF THE DIAPER COVER

You will need:
Sock Loom 2 

Two different colors of worsted weight yarn (4). [Navy Blue and Yellow were used]
Crochet Hook
Loom Tool
Stitch Markers
Scissors

Pattern:

Before beginning determine what is your Main Color (MC) and what is going to be your Contrasting Color (CC). 

  • Start with one side of the Sock Loom 2 (24 pegs). 
    • Begin at the 6th peg and cast on 12 pegs. (You should have 5 empty pegs on each side of the stitches you casted on)
    • Now do 17 rows of the garter stitch (knit a row, purl a row, repeat process)
    • Attach the first row to the other side of the loom. Note: You will not be able to place them on the same amount of pegs, instead you will attach them on one less peg on each side as shown in picture below. 
  • Now cut yarn leaving a tail. 
  • Start a new cast on row at the beginning like normal. 
  • Knit one row in a round, using all pegs on loom. You will be wrapping the loom twice so there will be some pegs with 3 loops on them. Simply Knit 2 loops over 1 on those pegs. 
  • Work in a round for 5 knit rows (I used e-wrap method). 
  • You have now created the holes for the legs. 
  • Time to work the diagram below which is set up to work the pattern on BOTH SIDES of the diaper cover: 
  • Make sure to pay attention to what color you are using either MC = Main Color or AC = Alternating Color. This is where stitch markers will be very useful!! 
  • Rows 1-5 Knit in MC 
  • Rows 6-8 K3 MC, K3 AC *repeat to end of row (when you cast on the AC color it will be on the first peg of the 3 you do in that color)
  • Rows 9-11 K3 AC, K3 MC *repeat to end of row
  • Now cut AC and tie it to MC color
  • Rows 12-13 Knit MC
  • Using stitch markers mark off the following for Row 14 (I have written it like this to help you check off as you set it up.):
    • K2 MC 
    • K3 AC 
    • K2 MC 
    • K3 AC 
    • K3 MC 
    • K1 AC
    • K3 MC 
    • K3 AC
    • K9 MC 
    • K3 AC 
    • K2 MC 
    • K3 AC
    • K3 MC
    • K1 AC 
    • K3 MC 
    • K3 AC 
    • K7 MC
  • Rows 15-16 adjust your stitch markers for the following below. I know it looks intimidating but there are only minor changes. This is to check your work.
    • K2 MC
    • K1 AC
    • K4 MC
    • K1 AC
    • K1 MC
    • K1 AC
    • K2 MC
    • K1 AC
    • K1 MC
    • K1 AC
    • K2 MC
    • K1 AC
    • K11 MC
    • K1 AC
    • K4 MC
    • K1 AC
    • K1 MC
    • K1 AC
    • K2 MC
    • K1 AC
    • K1 MC
    • K1 AC
    • K2 MC
    • K1 AC
    • K9 MC
  • Row 17 adjust to the following: (Again Minor Changes)
    • K2 MC
    • K1 AC
    • K4 MC
    • K1 AC
    • K1 MC
    • K1 AC
    • K2 MC
    • K1 AC
    • K1 MC
    • K1 AC
    • K2 MC
    • K2 AC
    • K10 MC
    • K1 AC
    • K4 MC
    • K1 AC
    • K1 MC
    • K1 AC
    • K2 MC
    • K1 AC
    • K1 MC
    • K1 AC
    • K2 MC
    • K2 AC
    • K8 MC
  • Rows 18-19 adjust as follows:
    • K2 MC
    • K1 AC
    • K4 MC
    • K1 AC
    • K1 MC
    • K1 AC
    • K2 MC
    • K1 AC
    • K1 MC
    • K1AC
    • K2 MC
    • K1 AC
    • K11 MC
    • K1 AC
    • K4 MC
    • K1 AC
    • K1 MC
    • K1 AC
    • K2 MC
    • K1 AC
    • K1 MC
    • K1 AC
    • K2 MC
    • K1AC
    • K9 MC
  • Row 20: 
    • K2 MC
    • K1 AC
    • K4 MC
    • K3 AC
    • K2 MC
    • K1 AC
    • K1 MC
    • K1 AC
    • K2 MC
    • K3 AC
    • K9 MC
    • K1 AC
    • K4 MC
    • K3 AC
    • K2 MC
    • K1 AC
    • K1 MC
    • K1 AC
    • K2 MC
    • K3 AC
    • K7 MC
  • WOOHOO THAT PART IS DONE!! Love takes work right? 
  • Now cut AC color and tie to MC color
  • Rows 21-24 Knit in MC color
  • Crochet bind off with 2 chains in between.
  • For the "belt" I used 3 strands of yarn (1 blue, 2 yellow) and braided them together. I then worked it through where I had crochet bind off alternating "in" and "out" of the holes. You could use ribbon as well.
  • I believe this will work for newborn or slightly bigger depending on the baby. 


March 10, 2014

3 Tips For Choosing Yarn


Over the years I have noticed there are three ways I decide on the yarn I want to use for a project.

  • First: The gauge of the loom is the first consideration.
    • Gauge is the space between the pegs. 
    • The bigger the gauge the more likely it is I want to use a bulky or super bulky yarn so that I can use only one strand. 
    • If I can't find a bulky yarn I will have to use two strands of a different weight yarn which I don't always like to do. 

  • Second: Texture
    • It is a great way to add to a project. 
      • For example, Lion Brand Homespun yarn. I like the feel and texture of it.
    • Is the project for a baby? Then I would want a soft yarn of course. Is it for home, like a dishcloth? Then I might want a more "rough" yarn. 
  • Third: Cost
    • A project like a baby blanket or adult blanket requires more yarn therefore more cost is involved.
    • I have to figure out my "budget" for each project and choose accordingly for it. 
    • Please don't go into debt with yarn. There are some wonderful "cheaper" yarns out there. I have found some great ones at a dollar store. 
      • For example, the hat you see me wear in the logos on my Facebook Page and Video was made with a skein of yarn from the dollar store which only cost $1.00. 

So, there are my 3 simple tips for choosing yarn: 
Gauge, Texture and Cost.

March 8, 2014

Battle Of The Diaper Cover


This friendly diaper cover competition is between Virginia of Simply Intertwined and Bonny of Looming Exclusive Designs. Please check out Simply Intertwined's Facebook page on March 14 2014 between 5:00 pm to 11:30 pm (Eastern Standard Time) to view pictures and to vote on your favorite. You will not know who designed which one until voting is over that night.

March 5, 2014

The Mint Baby Hat Pattern

This pattern is similar to my Simply Two Will Do Hat but made more for a baby.


What you will need:
Sock Loom 2 or All In One Loom from Authentic Knitting Board
Two colors of yarn (weight of 4): Green and White were used above
Scissors
Crochet Hook
Loom Tool
Row Counter
Pattern:
  • Using the Sock Loom 2 (or All In One) cast on 54 pegs in a round using e-wrap or other method.
    • This is all the pegs on the Sock Loom 2
  • Using the white yarn, K1P1 for 5 rows (K1P1= knit one peg, purl one peg)
  • Add Green yarn at start
  • Using BOTH the green and white yarn alternate the colors on the pegs as you still K1P1 for 4 rows
    • I used green on my knitted pegs and white on the pegs I purled
    • During your last row of K1P1 make sure to end with green, you need to Knit the last two pegs in green. This will help the rows line up for hat. 
  • In white knit one row
  • In green knit one row
  • In white knit one row
  • In green knit one row
  • In white knit 3 rows
  • Now go back to using BOTH colors and alternate like you did before when K1P1 for 10 rows
  • Cut the green one leaving a tail. Tie this "tail" to the white yarn
  • In white knit 4 rows
  • Gather Bind Off 


Small Bow-Wow Sweater Written Pattern


You will need:
The small blue 24 pegs Knifty Knitter circle loom
Use two strands of yarn (weight of 4) at the same time (can be the same or different colors)
Scissors 
Loom Tool
Crochet Hook
Row Counter
Stitch Markers

Pattern:

  • Using two strands of yarn do the e-wrap knitting cast on 
    • You can use a different cast on
  • Garter Stitch for 8 rows
  • Bind Off 4 Pegs on each side as show below

  • Now work on just two pegs in front for 6 rows

  • Now wrap the empty pegs as you work your way around for one row of knit.
    • The empty pegs will only be wrapped now and then knitted over in the next step.
  • E-wrap knit for 10 rows
  • Bind off 8 pegs 


  • Now e-wrap knit for 10 rows as a flat panel on the other pegs.
  • Do the garter stitch for 5 rows (ending on a knit)
  • Crochet cast off with one chain in between

Videos That Will Help: (click on title)