Showing posts with label free pattern. Show all posts

January 29, 2015

Raven Child Cowl


My daughter is 7 and I wanted to make her a snug cowl for in the morning when it can be very cold waiting for the bus. She wanted it in black hence the "raven" naming of it. She did like it more than the face she is giving in the picture--not quite a morning person.

December 17, 2014

Melted Puffy Slouchy Hat


You will need:
  • All In One Loom
  • Bulky Yarn (weight of 5 or 6)
  • Yarn (weight of 4) * You will be using two strands at once so you can use either two different colors or the same.
  • Row Counter (optional)
Videos that may help:
(Click on title to view)
Notes: MC refers to "Main Color" & CC refers to "Contrasting Color"
           Knit refers to e-wrap knit unless stated otherwise
  1. Set 74 pegs in a round on the All In One Loom
  2. Scalloped Cast On in MC
  3. Flat Knit 1 row
  4. E-ewrap Knit 1 row
  5. Rib Stitch (K1P1) 5 rows
  6. Add CC, leave MC alone. (Remember you will be using two strands of this weighted yarn at once.)
  7. Knit 3 rows in CC
  8. K1P1 2 rows where you Knit in MC and Purl in CC
  9. P1K1 2 rows where you Purl in MC and Knit in CC
  10. Cut CC and attach to MC
  11. Knit 1 row
  12. Increase by two pegs by moving slider over one
  13. Knit 1 row
  14. Increase another 2 pegs like before
  15. Purl 1 row
  16. Knit 1 row
  17. Increase by two pegs again
  18. Knit 2 rows
  19. Increase by two pegs again
  20. K1P1
  21. P1K1
  22. Increase by two again
  23. Knit 1 row
  24. Increase by two again
  25. K1P1
  26. P1K1
  27. Increase by two again
  28. Purl 2 rows
  29. Increase by 2
  30. K1P1
  31. P1K1
  32. Knit 6 rows
  33. Cut MC attach CC
  34. Knit 8 rows
  35. Drawstring bind off

July 8, 2014

Basic Steering Wheel Cover Pattern

Before
*Important, you will want the cover to be tightly on there to be safe to drive. 

After doing some research I came up with my plan of action.

April 1, 2014

Mini Easter Basket Pattern

Height is 6.5-7 inches Tall


You will need the small blue Knifty Knitter (24 pegs).
Two Strands of Worsted Weight Yarn (weight of 4)

  • Using two strands of yarn, do the drawstring cast on. (Click here for video)
  • Knit one row (e-wrap method was used)
  • Purl one row
  • K3P3 for 6 rows
  • Close drawstring
    • It will be tight, don't pull too hard. Close as much as possible and use a crochet hook to tie it closed. 
  • K3P3 for 2 rows
  • P3K3 for 2 rows
  • K3P3 for 2 rows
  • Crochet Bind off with one chain in between (Click here for video)
  • Now make an I-Cord for 30 rows with one strand of yarn and attach to basket for handle. (Click here for how to make an I-Cord)
    • Use a crochet hook to tie handle to basket. 
  • Fill with a small surprise! 


March 26, 2014

The Foster Hat

This past week I was able to make a cute, simple hat for a child in the foster care system. She loved it!


Using 76 pegs in the round on the All In One Loom, I alternated color and stitches. I didn't have a set pattern, deciding for this project to just loom it. I started with a chunky, pink yarn and did a small garter brim. From there, I switched to a soft, pretty blue yarn and "winged" it by alternating the stitches. I use a few rows of regular e-wrap knitting then went into the Figure 8 Stitch for awhile, then to the Moss Stitch, finishing off with the e-wrap knit stitch and basic bind off. The girl was in her teens and the hat fit her and me. I was happy she loved it.

The yarn was actually given to me by a couple looming friends and I want to say "Thank You" again because I repaid your gift by making a gift for someone else.

That is part of what looming is about to me. This will be under "free patterns" even though I don't have "specifics" in terms of row count. Just trust your instincts for how many to do of each.

March 16, 2014

"A Little Love" Diaper Cover

**NOTE: DESIGN IS ON THE FRONT AND BACK OF THE DIAPER COVER

You will need:
Sock Loom 2 

Two different colors of worsted weight yarn (4). [Navy Blue and Yellow were used]
Crochet Hook
Loom Tool
Stitch Markers
Scissors

Pattern:

Before beginning determine what is your Main Color (MC) and what is going to be your Contrasting Color (CC). 

  • Start with one side of the Sock Loom 2 (24 pegs). 
    • Begin at the 6th peg and cast on 12 pegs. (You should have 5 empty pegs on each side of the stitches you casted on)
    • Now do 17 rows of the garter stitch (knit a row, purl a row, repeat process)
    • Attach the first row to the other side of the loom. Note: You will not be able to place them on the same amount of pegs, instead you will attach them on one less peg on each side as shown in picture below. 
  • Now cut yarn leaving a tail. 
  • Start a new cast on row at the beginning like normal. 
  • Knit one row in a round, using all pegs on loom. You will be wrapping the loom twice so there will be some pegs with 3 loops on them. Simply Knit 2 loops over 1 on those pegs. 
  • Work in a round for 5 knit rows (I used e-wrap method). 
  • You have now created the holes for the legs. 
  • Time to work the diagram below which is set up to work the pattern on BOTH SIDES of the diaper cover: 
  • Make sure to pay attention to what color you are using either MC = Main Color or AC = Alternating Color. This is where stitch markers will be very useful!! 
  • Rows 1-5 Knit in MC 
  • Rows 6-8 K3 MC, K3 AC *repeat to end of row (when you cast on the AC color it will be on the first peg of the 3 you do in that color)
  • Rows 9-11 K3 AC, K3 MC *repeat to end of row
  • Now cut AC and tie it to MC color
  • Rows 12-13 Knit MC
  • Using stitch markers mark off the following for Row 14 (I have written it like this to help you check off as you set it up.):
    • K2 MC 
    • K3 AC 
    • K2 MC 
    • K3 AC 
    • K3 MC 
    • K1 AC
    • K3 MC 
    • K3 AC
    • K9 MC 
    • K3 AC 
    • K2 MC 
    • K3 AC
    • K3 MC
    • K1 AC 
    • K3 MC 
    • K3 AC 
    • K7 MC
  • Rows 15-16 adjust your stitch markers for the following below. I know it looks intimidating but there are only minor changes. This is to check your work.
    • K2 MC
    • K1 AC
    • K4 MC
    • K1 AC
    • K1 MC
    • K1 AC
    • K2 MC
    • K1 AC
    • K1 MC
    • K1 AC
    • K2 MC
    • K1 AC
    • K11 MC
    • K1 AC
    • K4 MC
    • K1 AC
    • K1 MC
    • K1 AC
    • K2 MC
    • K1 AC
    • K1 MC
    • K1 AC
    • K2 MC
    • K1 AC
    • K9 MC
  • Row 17 adjust to the following: (Again Minor Changes)
    • K2 MC
    • K1 AC
    • K4 MC
    • K1 AC
    • K1 MC
    • K1 AC
    • K2 MC
    • K1 AC
    • K1 MC
    • K1 AC
    • K2 MC
    • K2 AC
    • K10 MC
    • K1 AC
    • K4 MC
    • K1 AC
    • K1 MC
    • K1 AC
    • K2 MC
    • K1 AC
    • K1 MC
    • K1 AC
    • K2 MC
    • K2 AC
    • K8 MC
  • Rows 18-19 adjust as follows:
    • K2 MC
    • K1 AC
    • K4 MC
    • K1 AC
    • K1 MC
    • K1 AC
    • K2 MC
    • K1 AC
    • K1 MC
    • K1AC
    • K2 MC
    • K1 AC
    • K11 MC
    • K1 AC
    • K4 MC
    • K1 AC
    • K1 MC
    • K1 AC
    • K2 MC
    • K1 AC
    • K1 MC
    • K1 AC
    • K2 MC
    • K1AC
    • K9 MC
  • Row 20: 
    • K2 MC
    • K1 AC
    • K4 MC
    • K3 AC
    • K2 MC
    • K1 AC
    • K1 MC
    • K1 AC
    • K2 MC
    • K3 AC
    • K9 MC
    • K1 AC
    • K4 MC
    • K3 AC
    • K2 MC
    • K1 AC
    • K1 MC
    • K1 AC
    • K2 MC
    • K3 AC
    • K7 MC
  • WOOHOO THAT PART IS DONE!! Love takes work right? 
  • Now cut AC color and tie to MC color
  • Rows 21-24 Knit in MC color
  • Crochet bind off with 2 chains in between.
  • For the "belt" I used 3 strands of yarn (1 blue, 2 yellow) and braided them together. I then worked it through where I had crochet bind off alternating "in" and "out" of the holes. You could use ribbon as well.
  • I believe this will work for newborn or slightly bigger depending on the baby. 


March 5, 2014

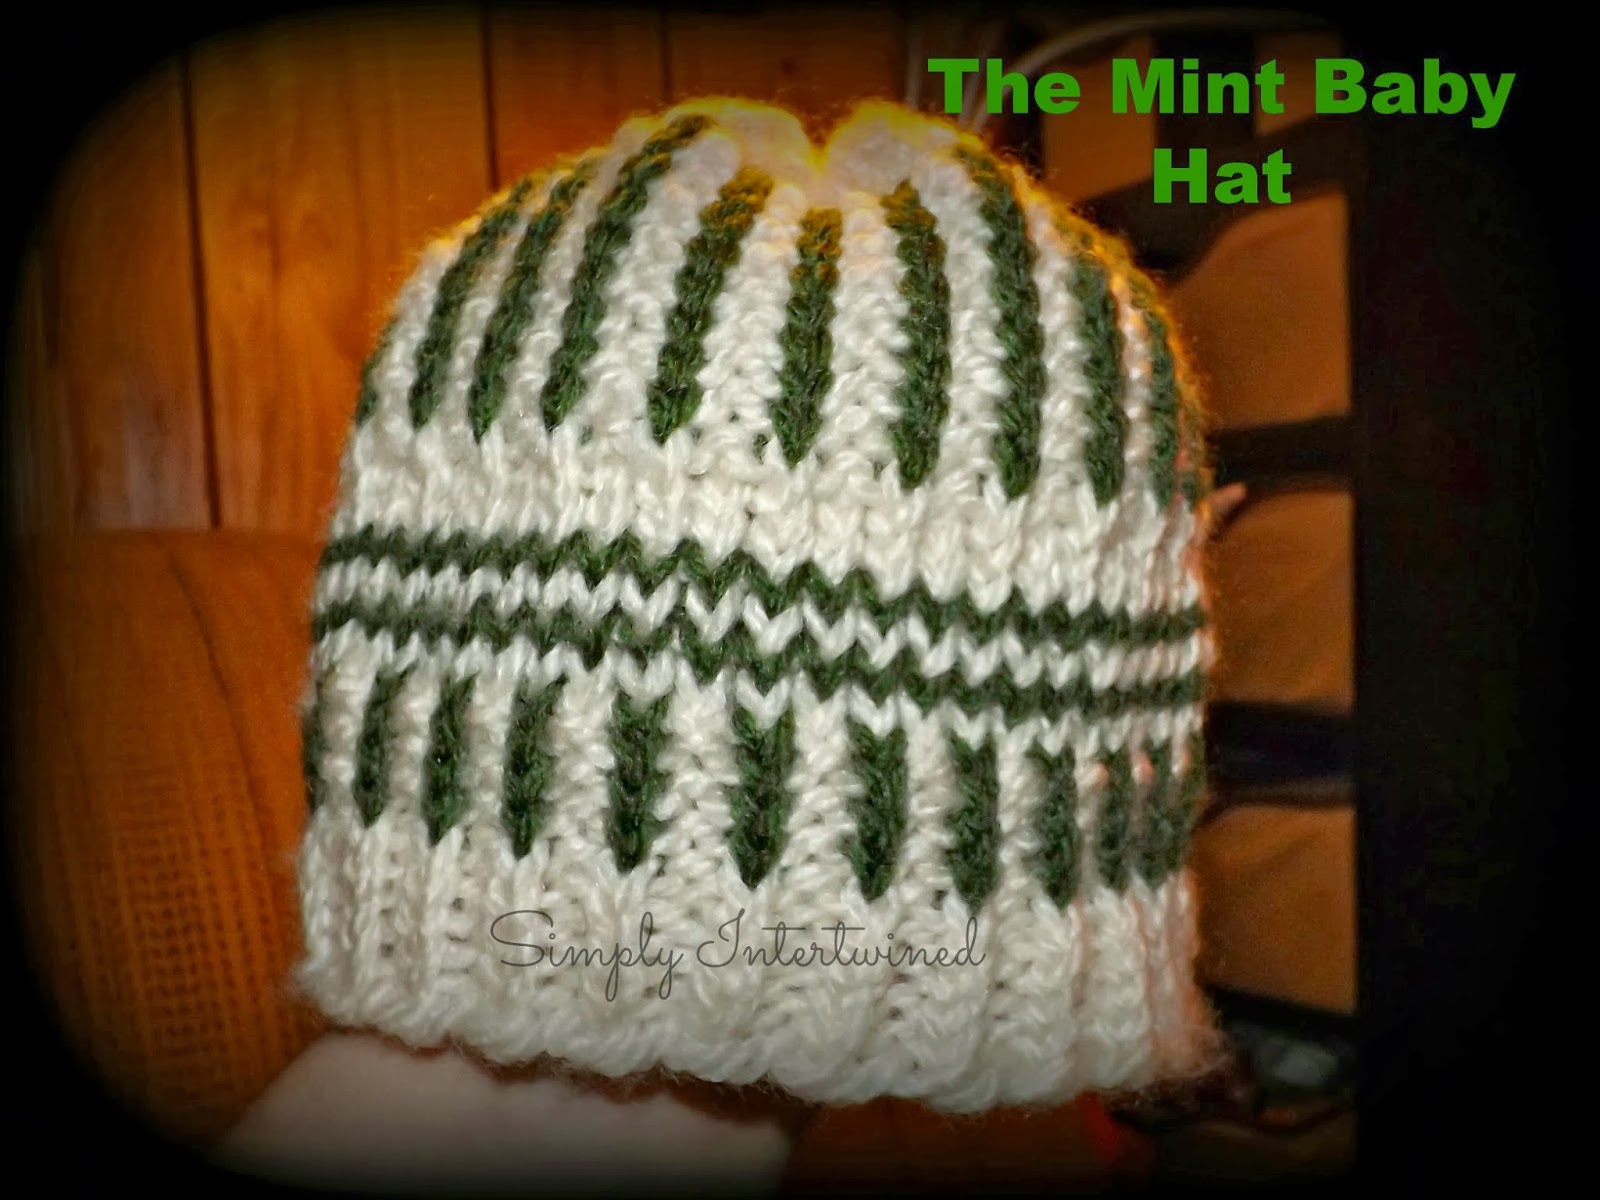
The Mint Baby Hat Pattern

This pattern is similar to my Simply Two Will Do Hat but made more for a baby.


What you will need:
Sock Loom 2 or All In One Loom from Authentic Knitting Board
Two colors of yarn (weight of 4): Green and White were used above
Scissors
Crochet Hook
Loom Tool
Row Counter
Pattern:
  • Using the Sock Loom 2 (or All In One) cast on 54 pegs in a round using e-wrap or other method.
    • This is all the pegs on the Sock Loom 2
  • Using the white yarn, K1P1 for 5 rows (K1P1= knit one peg, purl one peg)
  • Add Green yarn at start
  • Using BOTH the green and white yarn alternate the colors on the pegs as you still K1P1 for 4 rows
    • I used green on my knitted pegs and white on the pegs I purled
    • During your last row of K1P1 make sure to end with green, you need to Knit the last two pegs in green. This will help the rows line up for hat. 
  • In white knit one row
  • In green knit one row
  • In white knit one row
  • In green knit one row
  • In white knit 3 rows
  • Now go back to using BOTH colors and alternate like you did before when K1P1 for 10 rows
  • Cut the green one leaving a tail. Tie this "tail" to the white yarn
  • In white knit 4 rows
  • Gather Bind Off 


February 26, 2014

Simple Barefoot Sandals Pattern


Rough written pattern for these.
Make sure to check out the video if you need more help. (click here)

You will need:
Worsted weight yarn (4)
Sock Loom 2 from Authentic knitting board (though you should be able to modify to other looms.)
Scissors
Crochet Hook
Knitting Tool


  • Using the sock loom 2 find the two pegs in the middle. 
  • Place loop on one peg and work your way back and forth between the two using the e-wrap method for 10-15 rows depending on how big you want the toe ring to be. (15 rows was used in picture above, I'm a size 8.5-9 shoe)
  • Now bring up one of the first loops and create your ring by placing it back on one of the pegs and knitting over. (hiding your starting tail as you go)
  • Now increase to create a "triangle" by determining how far out you want your triangle. I placed stitch markers at 5 pegs out from each side of the two original pegs used. 
  • Increase by wrapping a new empty peg as you go back and forth during each row until you hit your stitch markers. 
  • Crochet bind off with one chain in between. 
  • Decide if you want to use just pieces of yarn or a different cord idea, like mentioned in the video, to use to tie around ankle and attached one to each end.
  • Place toe in ring, wrap and tie around ankle and enjoy! 


February 21, 2014

Bumps On The Road Child Leg Warmers


My daughter helped to design and name these leg warmers. 

You will need:

The Authentic Knitting Board Sock Loom 2 
Crochet Hook
Worsted Weight Yarn (4) 
To know the Rib Stitch (click here for video) and Seed Stitch (click here for video)


 To begin configure the loom as so:


30 pegs are needed in a round. 

  • Cast On Ewrap Method (or another if you want)
  • Rows 1-6: Rib Stitch
  • Rows 7-10: Seed Stitch
  • Rows 11-14: Knit (e wrap method was used)
  • Rows 15-18: Seed Stitch
  • Rows 19-22: Knit (e wrap was used)
  • Rows 23-26: Seed Stitch
  • Rows 27-30: Knit (e wrap was used)
  • Rows 31-34: Seed Stitch
  • Rows 35- 59: Knit (e wrap was used)
  • Rows 60-66: Rib Stitch
  • Row 67: Knit (e wrap was used)
  • Cast Off: Crochet with 2 chains in between. (You may need to adjust to just one chain depending on the child. My daughter wanted them a little loose at the top.)
    • cast off is similar to how I did at the end of this video. (Go to min 22:40 when I start to take it off the loom)
  • Weave in any loose ends
  • Try on child before beginning the next to check fit. 
Note:  My daughter is 6 1/2 years old.  Leg warmers were roughly 11 inches long. The biggest part of my daughter's leg was 9 inches around and there was still a little room. By using this loom you can easily adjust for a smaller or bigger child. 


February 6, 2014

Simply Two Will Do Hat Pattern


This simply design should work well for both men and women. 

What You Will Need
Loom Used: All In One Loom from Authentic Knitting Board
Yarn: Red Heart Navy Blue and Black (both weight of 4)
Scissors & Crochet Hook

Directions:

  • Using the black yarn cast on using  E wrap method for 80 pegs in a round
  • Row 1: Knit (e wrap method)
  • Row 2: Purl 
  • Row 3: Knit (e wrap method)
  • Row 4: Purl
  • Row 5-15 K2P2 (means to Knit 2 pegs then Purl 2 pegs) 
  • NOW ADD 2nd (navy) color on first peg that has the black
  • Rows 16-25: P2K2 Start with Black (purling the navy loop as well that is now on there with the black), then alternate the color yarn you are working with so that you are purling in black and knitting in navy in the round. 
  • Rows 26-28: Knit using the black (you can leave both yarns on there as you will be returning to the alternating again soon.)
  • Rows 29-33: K2P2 this time alternate colors where you are knitting in black and purling in navy, again starting with black.
  • Cut and tie the navy to the black yarn now
  • Rows 34-54 Knit in Black
  • Gather Bind Off
  • Use Crochet Hook to help secure hat close


January 27, 2014

Just In Time For Spring Infinity Scarf Pattern


Using one side of the above loom (18 pegs) I created this simple infinity scarf pattern. 
For a video tutorial click here.

  • Cast on with e-wrap method
  • Row 1: Knit (Flat method)
  • Row 2: Purl
  • Row 3: Knit (Flat method)
  • Row 4 to 10: Drop Stitch, re-wrap peg once before moving on.
  • Row 11: Knit (Flat method)
  • Repeat Rows 1-11 six more times for length in picture
  • Bring the beginning row up through the loom and attach loops onto pegs.
  • Knit over
  • Bind off: Crochet bind off with two chains in between. 


January 24, 2014

Sweet Dreams Baby Hat

**Note: This was originally posted as "Another Simple Baby Hat Pattern On Sock Loom". I decided to rename it.

Not sure why I'm in baby hat mode (most likely because I have a niece that is pregnant) but here is another hopefully simple pattern.


Using the sock loom above and all 60 pegs. You can try this on the Sock Loom 2 but the hat will be bigger unless you adjust.

January 23, 2014

Cuddle Me Baby Hat

**Note: This was originally titled the "Very Simple Baby Hat Using Sock Loom" however I decided to rename it. 

January 16, 2014

Free Drop Stitch Hat Pattern


Simple Drop Stitch Hat Pattern 


  • Using the Yellow Knifty Knitter Circle loom (41 pegs) and two strands of worsted weight (4) yarn. (Coral was used in picture)
  • Cast On with E-Wrap method
  • Row 1: Purl
  • Row 2: Knit
  • Rows 3 thru 10: Double Stitch or Tight Stitch (click here for video)
  • Rows 12 thru 14: Drop Stitch, only one re-wrap peg once before moving on  
  • Rows 15 thru 17: Knit (I used the e-wrap method)
  • Rows 18 thru 23: Drop Stitch only one re-wrap of peg again
  • Rows 24 thru 26: Knit (I used e-wrap method)
  • Cast Off: Gather bind off (what is used typically for hats) 
* The "brim" does curl some but you can smooth it down a little or choose to do a different brim. I kept this very simple but, to me, it looks much better in person for a spring/fall type hat.


December 1, 2013

Simple Woman's Fingerless Gloves Pattern


Using the same sock loom as in the recent man's fingerless gloves I created another simple pattern for a woman.

Yarn used was Red Heart Comfort ("black) weight 4. Click here more details
*Remember may need to be adjusted to fit a smaller or bigger wrist.*
1. Cast on 42 pegs in a round using the e-wrap cast on.
2. P2tog = 1 row
3. Purl = 1 row
4. P2tog = 1 row
5. Purl = 1 row
6. Knit = 10 rows (using e-wrapping)
7. Now create thumb hole by moving loops off of one peg and moving over(and knitting over), then off another peg and moving over (and knitting over)  to create 2 empty pegs like picture. I used inside pegs. 

8. Work in a "U" knitting for 14 rows (e-wrapping method)
9. Knit = 5 rows CLOSING OFF the thumb hole as you go around. 
10. Figure 8 stitch = 15 rows
11. Crochet Cast Off with 2 chains in between. 

Helpful Videos:
*For how to do P2tog click here.
* For Figure 8 stitch click here
* For Crochet Cast Off click here


November 15, 2013

Basic Fingerless Gloves for Men

Basic Fingerless Gloves for Men

I had made these very simple fingerless gloves for a man using a worsted weight yarn (4) called Red Heart Comfort Yarn (Black)--click here for link to it at Joann's. My husband is "modeling" them. He is a big guy so these should work for most guys but may need to be tweaked for a thinner man.

 I used the sock loom with the metal pegs (since I had projects on my other looms). 

  • Use 44 pegs in a round.
  • Cast On (I just did an e-wrap cast on)
  • Garter Stitch 4 rows (knit a row, purl a row, knit a row, purl a row)
  • E-wrap knit 16 rows
  • Create thumb hole by moving loops off pegs and moving over like below
  •  Knit over when you move the loops over, three pegs should be empty like below

  • Work in a "U" for 20 rows
  • Now continue doing an e-wrap knitting (wrapping the empty pegs as you go) for 26 rows
  • Garter Stitch for 5 rows (knit a row, purl a row, knit a row, purl a row, knit a row)
  • Crochet cast off 2 chains in between 
  • Done! 
I hope it works for you. 

  • Note if you do a flat knit the gloves may become tighter.
  • Also if they turn them inside out, the "wrong" side might look cool too.